属于很老旧的内容了,简单写写,主要覆盖C++ Qt,PySide6,PyQt6。
尽管PyQt6没有PySide6的LGPL协议友好,但是.ui动态加载这一块,确实比Pyside6要强不少。
很多人抱怨Qt Designer(或Qt Creator中的Designer)不好用,其中有一个很大原因是,不太了解如何在Designer中使用自定义控件:
- 如果我用C++写一个自定义按钮,比如QPushButton的派生类,如何在Designer中放置它?
- 如果我用Python写一个自定义的Led控件,从QWidget派生的,如何在Designer中放置它?
- ...
正统的做法有两种:
- 插件法(Plugins):实现 Qt Designer 的插件,使得自定义插件可以和内置的QPushButton等一样拖拽放置。【这个东西比较复杂,写库(供别人用)时会比较有用,单独自已用意义不大】
- 提升法(Promotion):简单直接。只需要知道自定义控件所在文件名,比如xxxx.h 或 xxxx.py 等即可,即使设计ui时,这些文件不存在都没问题。
本文通篇不考虑插件法。
C++ 自定义控件
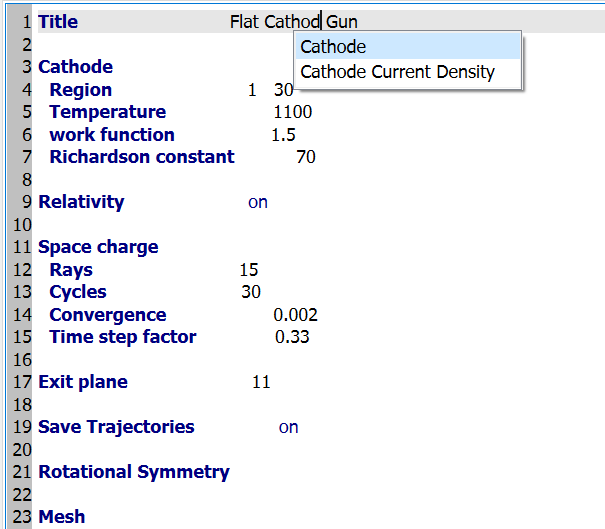
考虑简单场景,我写好了一个支持行号、语法高亮以及自动补全的文本编辑器,比如,像下面这样:

对应代码大概这样:
 1
 2
 3
 4
 5
 6
 7
 8
 9
10
11
12
13 | class DEBAO_WIDGETS_EXPORT CodeEdit : public QPlainTextEdit
{
Q_OBJECT
public:
CodeEdit(QWidget *parent = nullptr);
~CodeEdit() override;
bool isLineNumberVisible() const;
QCompleter *completer() const;
public slots:
void setLineNumberVisible(bool visible);
void setCompleter(QCompleter *c);
|
如何将其加入到designer的.ui文件中??
提升法
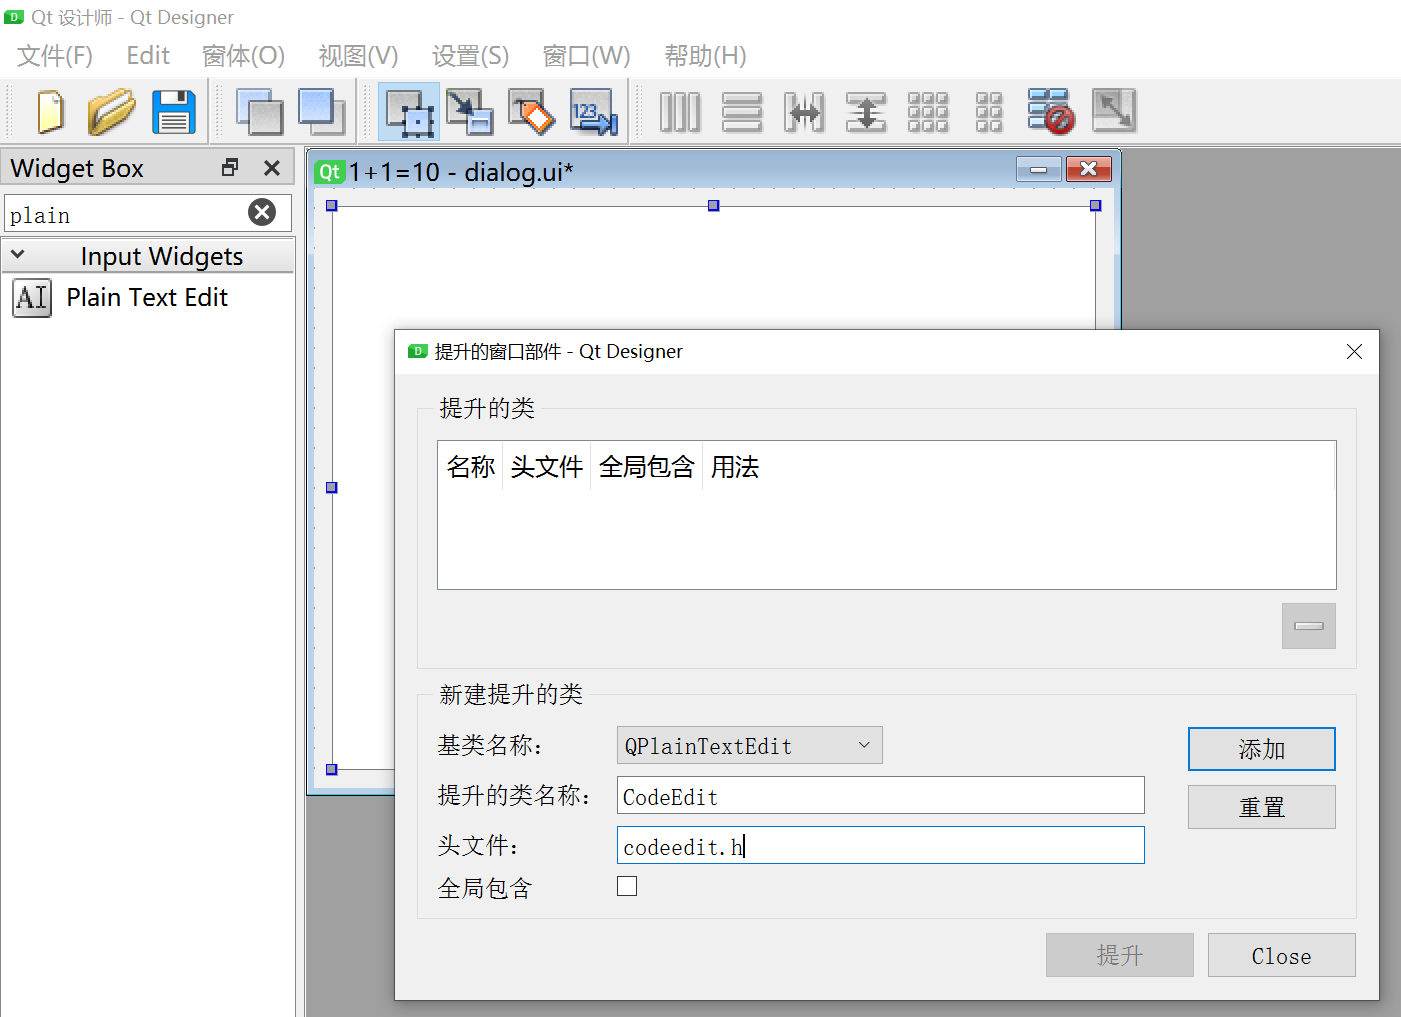
我们这个edit是从QPlainTextEdit派生的,所以只需要在designer拖拽一个 QPlainTextEdit 上去就行了:

然后提升它,注意输入:
- 类的名字(在C++下,可包含namespace信息,比如
Xxxx::Yyy::CodeEdit)
- 头文件的名字(可包含路径信息,比如
xxx/bbb.h,Python会自动处理这种情况)
这样就可以了。注意本文8个例子,使用的均是这一个.ui文件。
其实,我们直接拖拽一个QWidget上去,然后提升到CodeEdit也是完全可以的。只是右侧属性栏内容不太一样,designer阶段显示不够友好。但完全不影响后期运行效果。
C++Qt下.ui 如何用?(一)
常规用法,将其转换成 .cpp 文件(cmake或qmake可以自动进行这个操作),执行如下命令:
| uic dialog.ui -o ui_dialog.cpp
|
生成文件ui_dialog.cpp如下:
 1
 2
 3
 4
 5
 6
 7
 8
 9
10
11
12
13
14
15
16 | #include <QtCore/QVariant>
#include <QtWidgets/QApplication>
#include <QtWidgets/QDialog>
#include <QtWidgets/QVBoxLayout>
#include "codeedit.h"
QT_BEGIN_NAMESPACE
class Ui_Dialog
{
public:
QVBoxLayout *verticalLayout;
CodeEdit *plainTextEdit;
void setupUi(QDialog *Dialog)
{
|
里面用到了,我们设定的头文件 和 类名。仅此而已!
c++文件生成后,在代码中怎么用它就灵活了:
C++Qt下.ui 如何用?(二)
除了上面的常规用法,.ui 文件更灵活的用法是通过 QUiLoader 动态加载。
同样,由于要通过.ui文件动态加载自定义控件,这儿有两个路线可以选:
- 把自定义控件做成插件,供QUiLoader 使用。【自从有了Qt Creator,我个人就不再喜欢插件法。因为Qt Creator的版本和我们所用Qt的版本通常不一样,插件需要做两份】
- 派生QUiLoader,实现其
createWidget()以便于其运行时完成自定义控件的创建。【写起来还好,至少也很直观!!简单】
派生QUiLoader,示例代码如下:
 1
 2
 3
 4
 5
 6
 7
 8
 9
10
11
12
13
14
15 | #include "uiloader.h"
#include "codeedit.h"
UiLoader::UiLoader(QObject *parent)
:QUiLoader(parent)
{}
QWidget *UiLoader::createWidget(const QString &className, QWidget *parent, const QString &name)
{
if (className == "CodeEdit")
{
return new CodeEdit(parent);
}
return QUiLoader::createWidget(className, parent, name);
}
|
然后就可以用它来加载我们的包含自定义控件的 .ui 文件了:
| UiLoader loader;
QFile file(qApp->applicationDirPath() + "/../../dialog.ui");
file.open(QFile::ReadOnly);
QWidget *myWidget = loader.load(&file, this);
file.close();
myWidget->show();
|
PySide6
和 C++ 相对应,ui在PySide下主要也有两类用法。但是由于Python更灵活,所以还是有所不同...
PySide下.ui用法(一)
不知道你有没有疑惑? 在前面的ui文件中,我们指定的是 C++ 自定义控件的类名和头文件,那么这个文件怎么可以用于python呢??
常规用法,将前面的列出的.ui文件直接转换成 .py 文件,执行如下命令:
| pyside6-uic dialog.ui -o ui_dialog.py
|
内容大致如下(注意看,codeedit.h 没有对python造成困扰,它直接认为是模块 codeedit):
1
2
3
4
5
6
7
8
9
10
11
12
13
14
15
16
17
18
19
20
21
22
23
24
25
26 | from PySide6.QtCore import (QCoreApplication, QMetaObject, QObject, Qt)
from PySide6.QtWidgets import (QDialog, QSizePolicy, QVBoxLayout, QWidget)
from codeedit import CodeEdit
class Ui_Dialog(object):
def setupUi(self, Dialog):
if not Dialog.objectName():
Dialog.setObjectName(u"Dialog")
Dialog.resize(400, 300)
self.verticalLayout = QVBoxLayout(Dialog)
self.verticalLayout.setObjectName(u"verticalLayout")
self.plainTextEdit = CodeEdit(Dialog)
self.plainTextEdit.setObjectName(u"plainTextEdit")
self.verticalLayout.addWidget(self.plainTextEdit)
self.retranslateUi(Dialog)
QMetaObject.connectSlotsByName(Dialog)
# setupUi
def retranslateUi(self, Dialog):
Dialog.setWindowTitle(QCoreApplication.translate("Dialog", u"1+1=10", None))
# retranslateUi
|
python文件生成了,在代码中怎么用就灵活了:
PySide下.ui用法(二)
依然和C++下的用法二一样,不过Python下写代码比C++简单,下面是完整的可运行的伪代码:
 1
 2
 3
 4
 5
 6
 7
 8
 9
10
11
12
13
14
15
16
17
18
19
20
21
22
23
24
25
26
27
28
29 | # codeedit.py
import os.path
from PySide6.QtWidgets import QApplication, QPlainTextEdit
from PySide6.QtUiTools import QUiLoader
from PySide6.QtCore import QFile
class CodeEdit(QPlainTextEdit):
def __init__(self, parent=None):
super().__init__(parent)
self.appendPlainText("Hello 1+1=10")
class UiLoader(QUiLoader):
def createWidget(self, className, parent=None, name=""):
if className == "CodeEdit":
return CodeEdit(parent)
return super().createWidget(className, parent, name)
if __name__ == "__main__":
app = QApplication([])
loader = UiLoader()
file = QFile(os.path.join(os.path.dirname(__file__), "dialog.ui"))
file.open(QFile.ReadOnly)
window = loader.load(file)
file.close()
window.show()
app.exec()
|
逻辑和C++的完全一样,派生QUiLoader并实现的其createWidget()成员。
PySide下.ui用法(三)
不同于C++,在PySide下,还有一种用法。使用 loadUiType(这个应该是抄袭的PyQt的接口,内部实现方法差异很大)
注意:
- 这个函数在运行时加载.ui并生成相应的 Python 类和基类
- Qt官方建议使用本文提到的方法一(手动调用
pyside6-uic 的方法)
尤其要注意,官方说:
The internal process relies on uic being in the PATH. The pyside6-uic wrapper uses a shipped uic that is located in the site-packages/PySide6/uic, so PATH needs to be updated to use that if there is no uic in the system.
不管怎样,为了完整期间,一个可运行的例子如下:
 1
 2
 3
 4
 5
 6
 7
 8
 9
10
11
12
13
14
15
16
17 | import os.path
from PySide6.QtUiTools import loadUiType
from PySide6.QtWidgets import QApplication, QDialog
Ui_Dialog, base_class = loadUiType(os.path.join(os.path.dirname(__file__), "dialog.ui"))
class Dialog(QDialog, Ui_Dialog):
def __init__(self, parent=None):
super().__init__(parent)
self.setupUi(self)
if __name__ == "__main__":
app = QApplication([])
window = Dialog()
window.show()
app.exec()
|
该例子运行时会使用我们一开始的.ui文件,以及用法二中给出的 codeedit.py 文件。
PyQt6
PyQt历史比较久,资料更多,对ui文件的支持,也更强大,但由于GPL授权问题,我个人用它机会比较少。为了和PySide对比,还是简单写写
PyQt下.ui用法(一)
常规用法,将前面的列出的.ui文件直接转换成 .py 文件,执行如下命令:
| pyuic6 dialog.ui -o ui_dialog.py
|
注意和pyside6的命令区分。
生成结果如下(处理方式一样, codeedit.h 被它作为python模块 codedit):
 1
 2
 3
 4
 5
 6
 7
 8
 9
10
11
12
13
14
15
16
17
18
19
20 | from PyQt6 import QtCore, QtGui, QtWidgets
class Ui_Dialog(object):
def setupUi(self, Dialog):
Dialog.setObjectName("Dialog")
Dialog.resize(400, 300)
self.verticalLayout = QtWidgets.QVBoxLayout(Dialog)
self.verticalLayout.setObjectName("verticalLayout")
self.plainTextEdit = CodeEdit(parent=Dialog)
self.plainTextEdit.setObjectName("plainTextEdit")
self.verticalLayout.addWidget(self.plainTextEdit)
self.retranslateUi(Dialog)
QtCore.QMetaObject.connectSlotsByName(Dialog)
def retranslateUi(self, Dialog):
_translate = QtCore.QCoreApplication.translate
Dialog.setWindowTitle(_translate("Dialog", "1+1=10"))
from codeedit import CodeEdit
|
有了这个py文件,使用时可以直接用,或者单继承或多重继承
另外,不同于 PySide下的uic,PyQt下的uic还支持其他的命令行参数,比如-x
| pyuic6 dialog.ui -o ui_dialog.py
|
这样一来,生成的代码中会包含如下片段(编写小的demo时可能有用,或者作为使用参照):
| if __name__ == "__main__":
import sys
app = QtWidgets.QApplication(sys.argv)
Dialog = QtWidgets.QDialog()
ui = Ui_Dialog()
ui.setupUi(Dialog)
Dialog.show()
sys.exit(app.exec())
|
PyQt下.ui用法(二)!!
注意,PyQt 没有提供 QtUiTools模块的封装,所以不能像C++ Qt和 PySide下那么用 QtUiTools。但是
PyQt 自己用 python 实现了一个 uic 模块!!该模块有如下接口:
| PyQt6.uic.loadUi(uifile, baseinstance=None, package='')
|
可运行的示例代码如下:
1
2
3
4
5
6
7
8
9
10
11
12
13
14
15
16
17
18
19 | import os.path, sys
from PyQt6.QtWidgets import QApplication, QPlainTextEdit, QDialog
from PyQt6 import uic
class CodeEdit(QPlainTextEdit):
def __init__(self, parent=None):
super().__init__(parent)
self.appendPlainText("Hello 1+1=10")
class Dialog(QDialog):
def __init__(self):
super().__init__()
uic.loadUi(os.path.join(os.path.dirname(__file__), "dialog.ui"), self)
if __name__ == "__main__":
app = QApplication([])
window = Dialog()
window.show()
sys.exit(app.exec())
|
和PySide的用法二比较一下,可知 PyQt6的更简洁。毕竟它是 PyQt重写的,而不是对C++的 QtUiTools的简单封装。
PyQt下.ui用法(三)!!
PyQt 的uic模块也提供 loadUiType 函数:
| PyQt6.uic.loadUiType(uifile)
|
用起来和PySide下面几乎一样(毕竟PySide 仿制的对象就是PyQt),但是没有PySide的毛病,所以可以放心用:
1
2
3
4
5
6
7
8
9
10
11
12
13
14
15
16
17 | import os.path
from PyQt6.uic import loadUiType
from PyQt6.QtWidgets import QApplication, QDialog
Ui_Dialog, base_class = loadUiType(os.path.join(os.path.dirname(__file__), "dialog.ui"))
class Dialog(QDialog, Ui_Dialog):
def __init__(self, parent=None):
super().__init__(parent)
self.setupUi(self)
if __name__ == "__main__":
app = QApplication([])
window = Dialog()
window.show()
app.exec()
|
python下对.ui自定义控件路径处理
回到我们开头提到的自定义控件,需要指定头文件。但头文件时 c/c++ 下的概念,我们看看 python 下如何处理的:
pyside6-uic
- 如果头文件有
.h、.hpp、.hh 后缀,则去掉后缀
- 如果文件中有路径分隔符
/,则替换成 .
 1
 2
 3
 4
 5
 6
 7
 8
 9
10
11
12
13
14
15
16
17
18
19
20
21
22
23
24
25
26 | void WriteImports::addPythonCustomWidget(const QString &className, const DomCustomWidget *node)
{
if (className.contains("::"_L1))
return; // Exclude namespaced names (just to make tests pass).
if (addQtClass(className)) // Qt custom widgets like QQuickWidget, QAxWidget, etc
return;
// When the elementHeader is not set, we know it's the continuation
// of a Qt for Python import or a normal import of another module.
if (!node->elementHeader() || node->elementHeader()->text().isEmpty()) {
m_plainCustomWidgets.append(className);
} else { // When we do have elementHeader, we know it's a relative import.
QString modulePath = node->elementHeader()->text();
// Replace the '/' by '.'
modulePath.replace(u'/', u'.');
// '.h' is added by default on headers for <customwidget>.
if (modulePath.endsWith(".h"_L1, Qt::CaseInsensitive))
modulePath.chop(2);
else if (modulePath.endsWith(".hh"_L1))
modulePath.chop(3);
else if (modulePath.endsWith(".hpp"_L1))
modulePath.chop(4);
insertClass(modulePath, className, &m_customWidgets);
}
}
|
pyuic6
- 如果头文件以
.h 结尾,直接去掉后缀
- 如果有路径分割符
/ ,则替换成 .
源码逻辑:
 1
 2
 3
 4
 5
 6
 7
 8
 9
10
11
12
13
14
15
16
17 | def header2module(header):
"""header2module(header) -> strin
Convert paths to C++ header files to according Python modules
>>> header2module("foo/bar/baz.h")
'foo.bar.baz'
"""
if header.endswith(".h"):
header = header[:-2
mpath = []
for part in header.split('/'):
# Ignore any empty parts or those that refer to thcurrent
# directory.
if part not in ('', '.'):
if part == '..':
# We should allow this for Python3.
raise SyntaxError("custom widget header filname may not contain '..'."
mpath.append(part)
|
参考
- https://doc.qt.io/qt-6/designer-using-custom-widgets.html
- https://doc.qt.io/qtforpython-6/PySide6/QtUiTools/index.html
- https://www.riverbankcomputing.com/static/Docs/PyQt6/designer.html#pyuic6
- https://www.riverbankcomputing.com/static/Docs/PyQt6/api/uic/uic-module.html#PyQt6.uic.loadUi
- https://github.com/qt/qtbase/blob/dev/src/tools/uic

