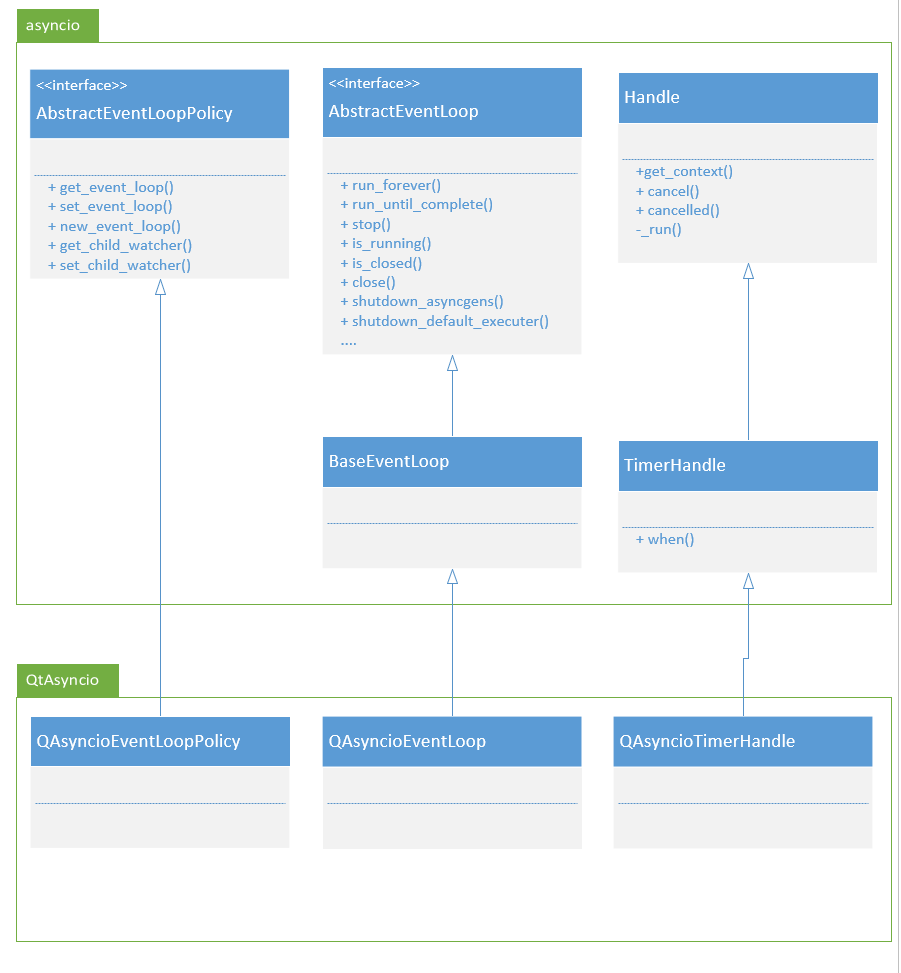
PySide 6.6.2 引入 QtAsyncio——基于Qt实现了asyncio的API,Qt开始拥抱Python协程。
为更好地与Python生态系统中的异步编程的asyncio、协程以及async/await语法集成。PySide借助于asyncio提供的API,用Qt事件循环替换了asyncio默认的事件循环。这样一个围绕QEventLoop以及相关类的封装以允许混合使用asyncio和Qt的实现,被称为QtAsyncio。它是PySide的第一个纯Python模块。
这个实现有两个层面内容:
- 事件循环和异步操作的基础设施,包括 Futures、TasksHandles、Executors、事件循环管理函数
- 用户面向应用程序的API,包括 传输和协议、网络连接、服务器、套接字、信号、子进程
目前QtAsyncio主要聚焦在第一个层面。
QtAsyncio这个东西怎样用,为什么要用?
例子
不妨,先用一个QTimer定时更新UI内容的小例子,
一步一步过渡到协程的写法:
例子1 - 异步,使用QTimer
从QTimer做这个事情,本身是很简单的:
 1
 2
 3
 4
 5
 6
 7
 8
 9
10
11
12
13
14
15
16
17
18
19
20
21
22
23
24
25
26
27
28
29 | from PySide6.QtCore import (QObject, QTimer, QDateTime)
from PySide6.QtWidgets import (QApplication, QPlainTextEdit)
import sys
class Helper(QObject):
def __init__(self, parent):
super().__init__(parent)
self.count = 0
self.timer = QTimer(self)
self.timer.timeout.connect(self.update_text)
self.timer.start(1000)
def update_text(self):
label = QDateTime.currentDateTime().toString("[HH:mm:ss]")
self.parent().appendPlainText(f"{label} Hello QTimer {self.count}")
self.count = self.count + 1
if self.count > 9:
self.timer.stop()
if __name__ == "__main__":
app = QApplication(sys.argv)
w = QPlainTextEdit()
w.resize(800, 600)
w.show()
helper = Helper2(w)
app.exec()
|
使用QTimer.singleShot,也可以找找回调一层嵌套的一层的感觉(回调地狱?),代码量和上面差不多:
 1
 2
 3
 4
 5
 6
 7
 8
 9
10
11
12
13
14
15
16
17
18
19
20
21
22
23
24
25
26
27 | from PySide6.QtCore import (QObject, QTimer, QDateTime)
from PySide6.QtWidgets import (QApplication, QPlainTextEdit)
import sys
class Helper2(QObject):
def __init__(self, parent):
super().__init__(parent)
self.count = 0
QTimer.singleShot(1000, self.update_text)
def update_text(self):
label = QDateTime.currentDateTime().toString("[HH:mm:ss]")
self.parent().appendPlainText(f"{label} Hello QTimer {self.count}")
self.count = self.count + 1
if self.count < 10:
QTimer.singleShot(1000, self.update_text)
if __name__ == "__main__":
app = QApplication(sys.argv)
w = QPlainTextEdit()
w.resize(800, 600)
w.show()
helper = Helper2(w)
app.exec()
|
这个方案,需要异步调用10次业务函数,如果能放到一个业务函数中,是否会更舒服?
例子2 - 同步,使用QThead::sleep
从核心代码上看,同步代码比异步要简单,主要是只需要一个业务函数
| for i in range(10):
sleep(1);
edit.appendPlainText("....");
|
但是,为了不阻塞GUI线程,以免界面死掉。我们需要使用多线程才行:
1
2
3
4
5
6
7
8
9
10
11
12
13
14
15
16
17
18
19
20
21
22
23
24
25
26
27 | from PySide6.QtCore import (Qt, Q_ARG, QMetaObject, QThread, QDateTime)
from PySide6.QtWidgets import (QApplication, QPlainTextEdit)
import sys
class Helper(QThread):
def __init__(self, w):
super().__init__()
self.w = w
def run(self):
for i in range(10):
QThread.sleep(1)
label = QDateTime.currentDateTime().toString("[HH:mm:ss]")
QMetaObject.invokeMethod(self.w, "appendPlainText", Qt.AutoConnection, Q_ARG(str, f"{label} Hello QThread::sleep {i}"))
if __name__ == "__main__":
app = QApplication(sys.argv)
w = QPlainTextEdit()
w.resize(800, 600)
w.show()
t = Helper(w)
t.start()
app.exec()
|
涉及多线程,麻烦的事情就多了,还是不好玩。
例子3 - 伪同步,事件循环嵌套
要干掉多线程,也不是不可能。只需不用阻塞的sleep就好了!?
嗯,我们可以用QEventLoop模拟阻塞的sleep操作:
| def my_sleep(interval):
loop = QEventLoop()
QTimer.singleShot(interval, loop.quit)
loop.exec()
|
有了这个sleep,剩下的事情就简单了:
1
2
3
4
5
6
7
8
9
10
11
12
13
14
15
16
17
18
19
20
21
22
23
24
25
26 | from PySide6.QtCore import (QDateTime, QEventLoop, QTimer)
from PySide6.QtWidgets import (QApplication, QPlainTextEdit)
import sys
def my_sleep(interval):
loop = QEventLoop()
QTimer.singleShot(interval, loop.quit)
loop.exec()
def update_text(w):
for i in range(10):
my_sleep(1000)
label = QDateTime.currentDateTime().toString("[HH:mm:ss]")
w.appendPlainText(f"{label} Hello embedded QEventLoop {i}")
if __name__ == "__main__":
app = QApplication(sys.argv)
w = QPlainTextEdit()
w.resize(800, 600)
w.show()
update_text(w)
app.exec()
|
事件循环嵌套,在Qt中用的很普遍,比如QDialog.exec(),QMenu.exec()等,都是这个套路。
但是,这复杂的程序的中,这个东西容易造成bug。这也是Qt有了exec()后,为什么又引入 QDialog.open(),QMenu.open() 的原因。
例子4 - 协程 asyncio
在 PySide引入 QtAsyncio之前,如果要使用 asyncio 怎么办?
我们可以参考PySide6.5的手册,写入如下一个例子:
 1
 2
 3
 4
 5
 6
 7
 8
 9
10
11
12
13
14
15
16
17
18
19
20
21
22
23
24
25
26
27
28
29
30
31
32
33
34
35
36
37
38
39
40
41
42
43
44
45
46
47
48
49
50
51
52
53
54
55
56
57
58
59
60
61
62
63
64
65
66
67
68
69
70
71
72
73
74
75
76
77
78
79
80
81
82
83
84
85
86
87
88
89
90
91
92
93
94
95
96
97
98
99
100
101
102
103
104
105
106
107
108
109
110
111 | from PySide6.QtCore import (QObject, QEvent, Slot, Signal, QDateTime)
from PySide6.QtWidgets import (QApplication, QPlainTextEdit)
import asyncio
import sys
class AsyncHelper(QObject):
''' This class copied from examples of PySide6.5
under BSD-3-Clause license.
'''
class ReenterQtObject(QObject):
""" This is a QObject to which an event will be posted, allowing
asyncio to resume when the event is handled. event.fn() is
the next entry point of the asyncio event loop. """
def event(self, event):
if event.type() == QEvent.Type.User + 1:
event.fn()
return True
return False
class ReenterQtEvent(QEvent):
""" This is the QEvent that will be handled by the ReenterQtObject.
self.fn is the next entry point of the asyncio event loop. """
def __init__(self, fn):
super().__init__(QEvent.Type(QEvent.Type.User + 1))
self.fn = fn
def __init__(self, worker, entry):
super().__init__()
self.reenter_qt = self.ReenterQtObject()
self.entry = entry
self.loop = asyncio.new_event_loop()
self.done = False
self.worker = worker
if hasattr(self.worker, "start_signal") and isinstance(self.worker.start_signal, Signal):
self.worker.start_signal.connect(self.on_worker_started)
if hasattr(self.worker, "done_signal") and isinstance(self.worker.done_signal, Signal):
self.worker.done_signal.connect(self.on_worker_done)
@Slot()
def on_worker_started(self):
""" To use asyncio and Qt together, one must run the asyncio
event loop as a "guest" inside the Qt "host" event loop. """
if not self.entry:
raise Exception("No entry point for the asyncio event loop was set.")
asyncio.set_event_loop(self.loop)
self.loop.create_task(self.entry())
self.loop.call_soon(self.next_guest_run_schedule)
self.done = False # Set this explicitly as we might want to restart the guest run.
self.loop.run_forever()
@Slot()
def on_worker_done(self):
""" When all our current asyncio tasks are finished, we must end
the "guest run" lest we enter a quasi idle loop of switching
back and forth between the asyncio and Qt loops. We can
launch a new guest run by calling launch_guest_run() again. """
self.done = True
def continue_loop(self):
""" This function is called by an event posted to the Qt event
loop to continue the asyncio event loop. """
if not self.done:
self.loop.call_soon(self.next_guest_run_schedule)
self.loop.run_forever()
def next_guest_run_schedule(self):
""" This function serves to pause and re-schedule the guest
(asyncio) event loop inside the host (Qt) event loop. It is
registered in asyncio as a callback to be called at the next
iteration of the event loop. When this function runs, it
first stops the asyncio event loop, then by posting an event
on the Qt event loop, it both relinquishes to Qt's event
loop and also schedules the asyncio event loop to run again.
Upon handling this event, a function will be called that
resumes the asyncio event loop. """
self.loop.stop()
QApplication.postEvent(self.reenter_qt, self.ReenterQtEvent(self.continue_loop))
class Update(QObject):
start_signal = Signal()
done_signal = Signal()
def __init__(self, w):
super().__init__(w)
@Slot()
def async_start(self):
self.start_signal.emit()
async def update_text(self):
for i in range(10):
await asyncio.sleep(1)
label = QDateTime.currentDateTime().toString("[HH:mm:ss]")
self.parent().appendPlainText(f"{label} Hello coroutine {i}")
self.done_signal.emit()
if __name__ == "__main__":
app = QApplication(sys.argv)
w = QPlainTextEdit()
w.resize(800, 600)
w.show()
u = Update(w)
helper = AsyncHelper(u, u.update_text)
u.async_start()
app.exec()
|
代码很复杂,为了将asyncio的事件循环整合进QCoreApplication的事件循环:
- 定义一个 AsyncHelper 类,用于控制asyncio的事件循环
- 定义一个 ReenterQtEvent 类,用于将 asyncio的事件封装成 Qt事件(以便于Qt处理)
- 定义一个 ReenterQtObject 类,用于处理接收到的 ReenterQtEvent 事件,恢复asyncio的事件数据
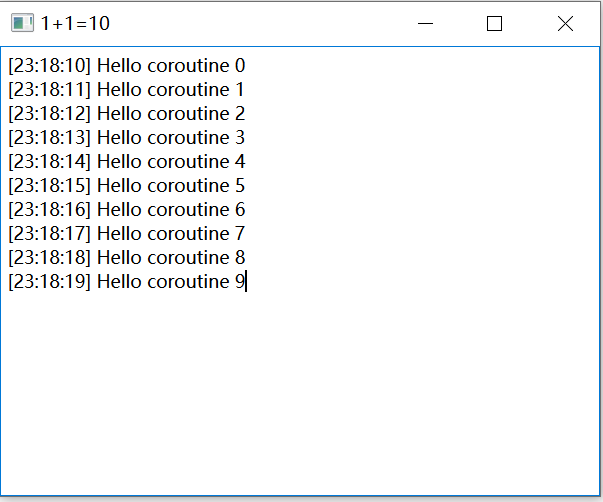
例子5 - 协程 使用QtAsyncio
回到正题,由于PySide6.6.2提供了QtAsyncio,我们用QtAsyncio来做这个事情:
1
2
3
4
5
6
7
8
9
10
11
12
13
14
15
16
17
18
19
20
21
22
23 | from PySide6.QtCore import (QTimer, QDateTime)
from PySide6.QtWidgets import (QApplication, QPlainTextEdit)
import PySide6.QtAsyncio as QtAsyncio
import asyncio
import sys
async def update_text(w):
for i in range(10):
await asyncio.sleep(1)
label = QDateTime.currentDateTime().toString("[HH:mm:ss]")
w.appendPlainText(f"{label} Hello coroutine {i}")
if __name__ == "__main__":
app = QApplication(sys.argv)
w = QPlainTextEdit()
w.resize(800, 600)
w.show()
QTimer.singleShot(0, lambda: asyncio.ensure_future(update_text(w)))
QtAsyncio.run()
|
首先,由于
- Qt需要事件循环:QCoreApplication.exec()
- asyncio也需要事件循环:event loop
所以,QtAsyncio需要整合这二者(网上也有第三方的库在做类似的事情)
其次,注意 ensure_future() 需要事件循环创建后才能使用。例子中使用QTimer将其推迟。
QtAsyncio
前面提到QtAsyncio是PySide的第一个纯python模块,目前主要实现了 事件循环和异步操作的基础设施,包括 Futures、TasksHandles、Executors、事件循环管理函数。
在python asyncio中:
- future 是底层基于回调的代码 与 高层async、await代码 之间的桥梁
- task 是封装了协程(coroutine)的future。用于在事件循环中执行协程
QtAsyncio实现了同样接口的两个类:
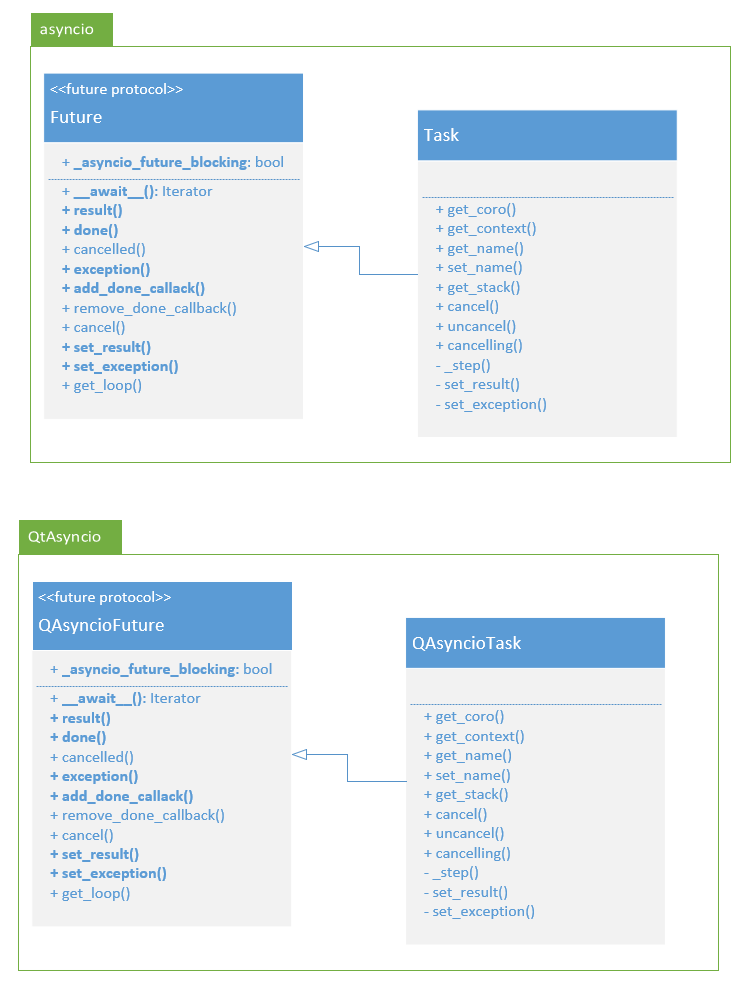
asyncio中对象是否是future的判定方法:
| def isfuture(obj):
"""Check for a Future.
This returns True when obj is a Future instance or is advertising
itself as duck-type compatible by setting _asyncio_future_blocking.
See comment in Future for more details.
"""
return (hasattr(obj.__class__, '_asyncio_future_blocking') and
obj._asyncio_future_blocking is not None)
|
另外,QtAsyncio 派生了自己的事件循环和策略类:
而后,为asyncio设置 policy 以使其使用 QAsncioEventLoop:
| asyncio.set_event_loop_policy(
QAsyncioEventLoopPolicy(quit_qapp=quit_qapp, handle_sigint=handle_sigint))
|
参考