在Windows下获取硬件(比如CPU、主板、硬盘、显卡、网卡...)的信息,主要是通过WMI实现。
本文涉及
- WMIC 工具使用【废弃】
- Get-WmiObject 使用 【废弃】
- Get-CimInstance 使用
- python下wmi 使用
- C++下 wmi 使用
- Qt下通过ActiveQt使用wmi 【本文重点】
__cpuid 使用
术语
- WMI:WIndows管理规范(Windows Management Instrumentation)。WMI是Windows操作系统提供的一种管理接口,从Windows 2000系统开始出现,它允许开发人员通过编程语言或脚本来访问和管理Windows系统的各种资源和服务。WMI通过提供COM/DCOM接口,使得开发人员可以从应用程序或脚本中直接调用WMI提供的功能来获取系统信息。WMI基于WBEM和CIM实现。
- WBEM:基于Web的企业管理(Web Based Enterprise Management)。1996年由BMC、Cisco、Compaq、Intel和Microsoft发起。
- CIM:公共信息模型(Common Information Model),是一个可扩展并面向对象的数据模型,含有与企业各个部门有关的信息。CIM也是由分布式管理任务组 (DMTF) 维护的跨平台标准。
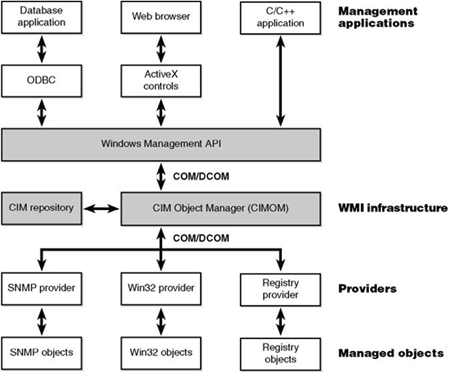
WMI
WMI提供COM/DCOM接口,可以通过C/C++客户端、VBScript或JScript脚本、Powershell 等.NET客户端 访问。
早期,WMI架构中是没有.Net的:
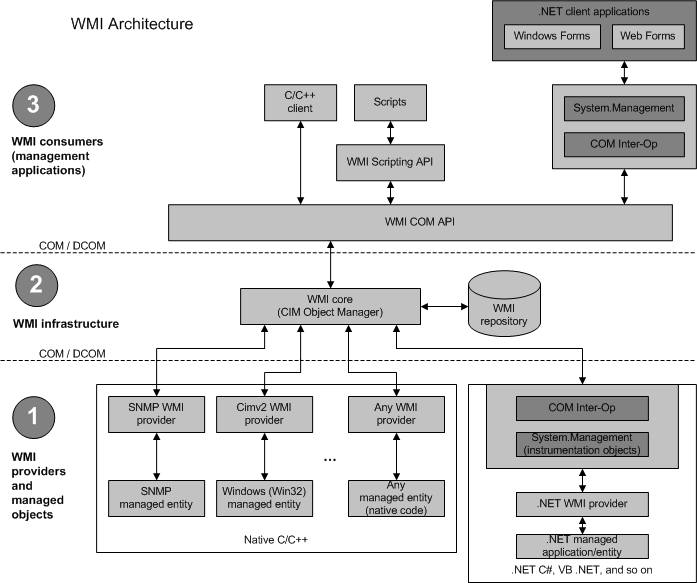
后来,.Net占据重要位置(感觉COM和.Net混杂挺乱):
注:可关注wbemtest 这个测试工具。
wmic
- https://learn.microsoft.com/en-us/windows-server/administration/windows-commands/wmic
这个东西出镜率挺高,但是它已经 被废弃了。因为功能太强,容易被黑客利用。
| The WMI command-line (WMIC) utility is deprecated as of Windows 10, version 21H1, and as of the 21H1 semi-annual channel release of Windows Server.
|
只是wmic这个命令行工具被废弃了,不是WMI功能被废弃了。
常用命令
- 查看cpu:
wmic cpu list brief
- 查看物理内存:
wmic memphysical list brief
- 查看逻辑内存:
wmic memlogical list brief
- 查看缓存内存:
wmic memcache list brief
- 查看虚拟内存:
wmic pagefile list brief
- 查看网卡:
wmic nic list brief
具体一点的:
- 获取cpu名称:
wmic cpu get Name
- 获取cpu核心数:
wmic cpu get NumberOfCores
- 获取cpu线程数:
wmic cpu get NumberOfLogicalProcessors
- 获取cpu序列号:
wmic cpu get processorid
- 获取主板序列号:
wmic baseboard get serialnumber
- 获取BIOS序列号:
wmic bios get serialnumber
- 获取硬盘序列号:
wmic diskdrive where index=0 get serialnumber
Get-WmiObject
- https://learn.microsoft.com/en-us/powershell/module/microsoft.powershell.management/get-wmiobject?view=powershell-5.1
这是Windows Powershell中的 cmdlet,在Windows Powershell 3.0中,已经被废弃,建议使用Get-CimInstance。而到了Powershell 6.0 (pwsh)中,它更是直接被移除了,比wmic还彻底。
一些命令:
- 获取cpu信息:
Get-WmiObject Win32_Processor
- 获取BIOS信息:
Win32_Bios
关于pwsh 与 powershell
https://github.com/powershell/powershell
从PowerShell 6开始,可执行程序的名字改为pwsh, 它使用 .NET Core,可以运行在Windows、Linux和macOS系统。
之前版本的PowerShell 只运行在Windows平台,叫做Window PowerShell,可执行程序的名字却为 powershell.exe。
Get-CimInstance
- https://learn.microsoft.com/en-us/powershell/scripting/learn/ps101/07-working-with-wmi?view=powershell-7.4
- https://learn.microsoft.com/en-us/powershell/scripting/samples/getting-wmi-objects--get-ciminstance-?view=powershell-7.4
CIM是Powershell 3.0 引入的。至少目前没过时
| Get-CimInstance Win32_BaseBoard
|
| Get-CimInstance Win32_PhysicalMemory
|
| Get-CimInstance Win32_Processor
|
| Get-CimInstance Win32_OperatingSystem
|
注意:要查看具体有什么class可用,使用
这个表很长,可以使用通配符过滤,比如:
| Get-CIMClass Win32*Processor
|
另外,微软官方上有列表:
* Computer System Hardware Classes
Python
python有 wmi 的第三方包,它依赖于 pywin32包。用起来挺简单:
 1
 2
 3
 4
 5
 6
 7
 8
 9
10
11
12
13
14
15
16
17
18
19
20
21
22
23
24
25
26
27
28
29
30
31
32
33
34
35 | import wmi
c = wmi.WMI()
# information about the cpu
for cpu in c.Win32_Processor():
print("Processor ID: %s" % cpu.ProcessorId.strip())
print("Process Name: %s" % cpu.Name.strip())
# information about the baseboard
for board_id in c.Win32_BaseBoard():
print("Board ID: %s" % board_id.SerialNumber.strip())
# information about the BIOS
for bios_id in c.Win32_BIOS():
print("BIOS Serial Number: %s" % bios_id.SerialNumber.strip())
# get disk information
for disk in c.Win32_DiskDrive():
print("Disk Serial Number: %s" % disk.SerialNumber.strip())
print("Disk Drive Caption: %s" % disk.Caption)
print("Disk Drive Size: %s" % disk.Size)
# get physical memory information
for memModule in c.Win32_PhysicalMemory():
print("Memory Capacity: %.fMB" % (int(memModule.Capacity)))
# get information about the OS
for os in c.Win32_OperatingSystem():
print("Windows Directory: %s" % os.WindowsDirectory)
print("Operating System: %s" % os.Caption)
print("OS Manufacturer: %s" % os.Manufacturer)
print("OS Configuration: %s" % os.BuildNumber)
print("OS Serial Number: %s" % os.SerialNumber)
print("OS Version: %s" % os.Version)
|
C++
如何在C、C++中通过WMI获取硬件信息?
要使用 C++ 创建 WMI 应用程序:必须初始化 COM、访问和设置 WMI 协议以及执行手动清理。 MSDN上有说明和举例。
- https://learn.microsoft.com/en-us/windows/win32/wmisdk/example--getting-wmi-data-from-the-local-computer
官方例子有中有点小问题,去掉using namespace或者将其起到最后。不然byte类型(C++17引入)会有二义性。
| #define _WIN32_DCOM
#include <iostream>
using namespace std;
#include <comdef.h>
#include <Wbemidl.h>
#pragma comment(lib, "wbemuuid.lib")
|
主要步骤:
- 通过 CoInitializeEx 初始化COM参数
- 通过CoInitializeSecurity初始化COM进程安全性
- 通过CoCreateInstance获取WMI初始定位符
- 通过IWbemLocator::ConnectServer获取本地
root\cimv2命名空间的IWebemServices指针
- 使用IWbemServices指针向WMI发出请求。这个请求是真正需要的东西
- 获取并显式查询数据
- 清理等其他操作
Github上有不少C++的对wmi的封装
- https://github.com/sondernextdoor/WindowsHardwareInfo
- https://github.com/bozali/wmi
- https://github.com/Thomas-Sparber/wmi
- https://github.com/sonodima/wmipp
Qt
Qt是C++的库,所以前面的C++中的东西都可以直接用。只是需要注意Qt中使用COM的一些坑...
Qt官方的qtsystems模块仓库中有具体封装wmi的例子(没有用ActiveQt):
- https://github.com/qt/qtsystems/blob/dev/src/systeminfo/windows/qwmihelper_win.cpp
Qt 与 COM初始化
注意:Qt在Windows下为了支持剪切板,所以QGuiApplication初始化时已经为主线程调用了 OleInitialize() 函数,一旦再次调用CoInitializeEx() 且使用不用的并发标志,会造成崩溃等问题。
由于 OLE 技术不是线程安全的, 因此 OleInitialize 函数使用 COINIT_APARTMENTTHREADED 标志调用 CoInitializeEx 。
MSDN中的Initializing the COM Library中,
- 提及CoInitializeEx时,说每个用到COM的线程都要调用它:
| Each thread that uses a COM interface must make a separate call to this function.
|
- 提及主线程时,说到主线程用COINIT_APARTMENTTHREADED:
| Generally, a thread that creates a window should use the COINIT_APARTMENTTHREADED flag, and other threads should use COINIT_MULTITHREADED.
|
MSDN中的 CoInitializeEx 函数 (combaseapi.h) 中,
- 提及 CoInitializeEx 可以多次调用,只要并发标志相同即可。
| 对于使用 COM 库的每个线程,CoInitializeEx 必须至少调用一次,并且通常只调用一次。 只要同一线程传递相同的并发标志,就允许同一线程多次调用 CoInitializeEx ,但后续的有效调用将返回S_FALSE。 若要在线程上正常关闭 COM 库,每次成功调用 CoInitialize 或 CoInitializeEx(包括返回S_FALSE的任何调用)都必须通过对 CoUninitialize 的相应调用进行平衡。
|
QAxObject
Qt中有ActiveQt模块,所以可以减少一些工作。
注:执行Qt自带的dumpdoc可以生成一个帮助文档。
| dumpdoc WbemScripting.SWbemLocator -o help.html
|
对于这个例子,由于涉及好多个QAxObject,我们可以需要对每个对象,都生成一个文档,这个最好在代码中进行,具体示例见下一节。
使用ActiveQt模组,我们可以写一个 WmiHelper 类:
1
2
3
4
5
6
7
8
9
10
11
12
13
14
15
16
17
18
19
20
21
22
23
24
25
26
27
28
29
30
31
32
33
34
35
36
37
38
39
40
41
42
43
44
45
46
47
48
49 | // demo file by dbzhang800 2023
#include <QApplication>
#include <QDebug>
#include <QUuid>
#include <QThread>
#include <QFile>
#include <QAxObject>
#include <Windows.h>
class WmiHelper : public QObject
{
public:
WmiHelper(QObject *parent=nullptr)
:QObject(parent)
{
// try to make Qt's GUI Thread happy.
if (CoInitializeEx(0, COINIT_MULTITHREADED) == RPC_E_CHANGED_MODE)
CoInitializeEx(0, COINIT_APARTMENTTHREADED);
wbemLocator = new QAxObject("WbemScripting.SWbemLocator");
wmiService = wbemLocator->querySubObject(
"ConnectServer(QString&,QString&)", ".", "ROOT\\CIMV2");
}
~WmiHelper()
{
delete wbemLocator;
CoUninitialize();
}
QString queryInfo(const QString &className, const QString &name)
{
QString info;
QAxObject *resultList = wmiService->querySubObject("ExecQuery(QString&))",
QString("SELECT %1 FROM %2").arg(name, className));
auto count = resultList->property("Count").toInt();
for (int i=0; i<count; ++i) {
QAxObject *item = resultList->querySubObject("ItemIndex(int)", i);
auto latin1 = name.toLatin1();
info = item->dynamicCall(latin1.data()).toString();
}
resultList->clear();
return info;
}
private:
QAxObject *wbemLocator {nullptr};
QAxObject *wmiService {nullptr};
};
|
然后我们可以在Qt的各处直接使用了(Gui线程,QCoreApplication线程,其他次线程):
 1
 2
 3
 4
 5
 6
 7
 8
 9
10
11
12
13
14
15
16 | int main(int argc, char *argv[])
{
QGuiApplication a(argc, argv);
WmiHelper wmiHelper;
qDebug() << "cpu: " << wmiHelper.queryInfo("Win32_Processor", "ProcessorId");
qDebug() << "bios: " << wmiHelper.queryInfo("Win32_BIOS", "SerialNumber");
qDebug() << "baseboard: " << wmiHelper.queryInfo("Win32_BaseBoard", "SerialNumber");
qDebug() << "disk: " << wmiHelper.queryInfo("Win32_DiskDrive", "SerialNumber");
qDebug() << "nic: " << wmiHelper.queryInfo("Win32_NetworkAdapter", "MACAddress");
qDebug() << "os: " << wmiHelper.queryInfo("Win32_OperatingSystem", "SerialNumber");
qDebug() << "cpu name: " << wmiHelper.queryInfo("Win32_Processor", "Name");
qDebug() << "os name: " << wmiHelper.queryInfo("Win32_OperatingSystem", "Caption");
return a.exec();
}
|
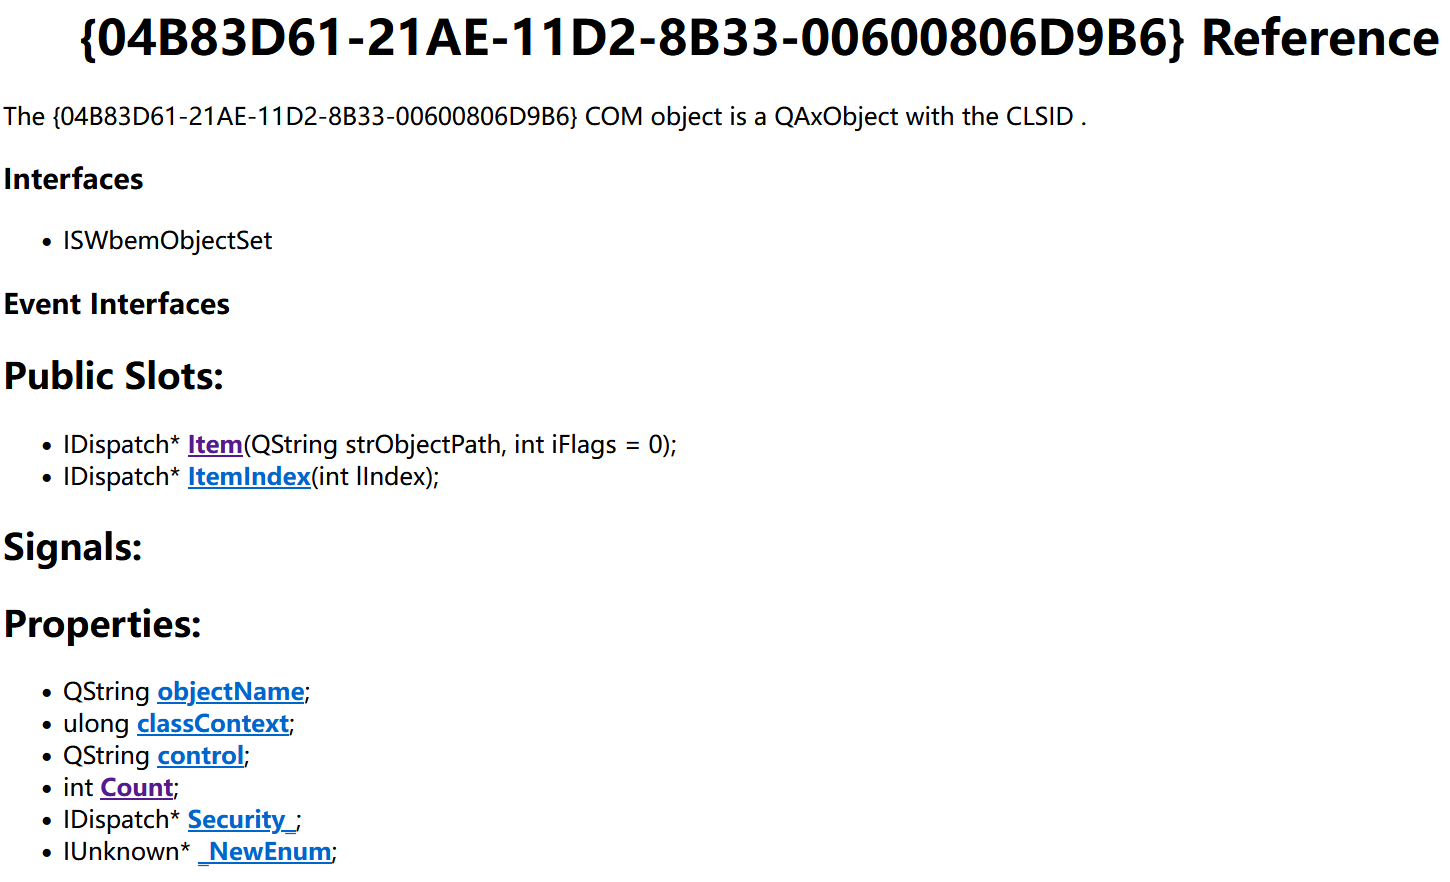
generateDocumentation
适当使用 QString QAxBase::generateDocumentation() 生成帮助文档,对我们使用ActiveQt有帮助,比如前面的代码,可以加上:
 1
 2
 3
 4
 5
 6
 7
 8
 9
10
11
12 | auto writeDoc = [](const QString &fileName, const QByteArray &content){
QFile f(fileName);
f.open(QFile::WriteOnly);
f.write(content);
f.close();
};
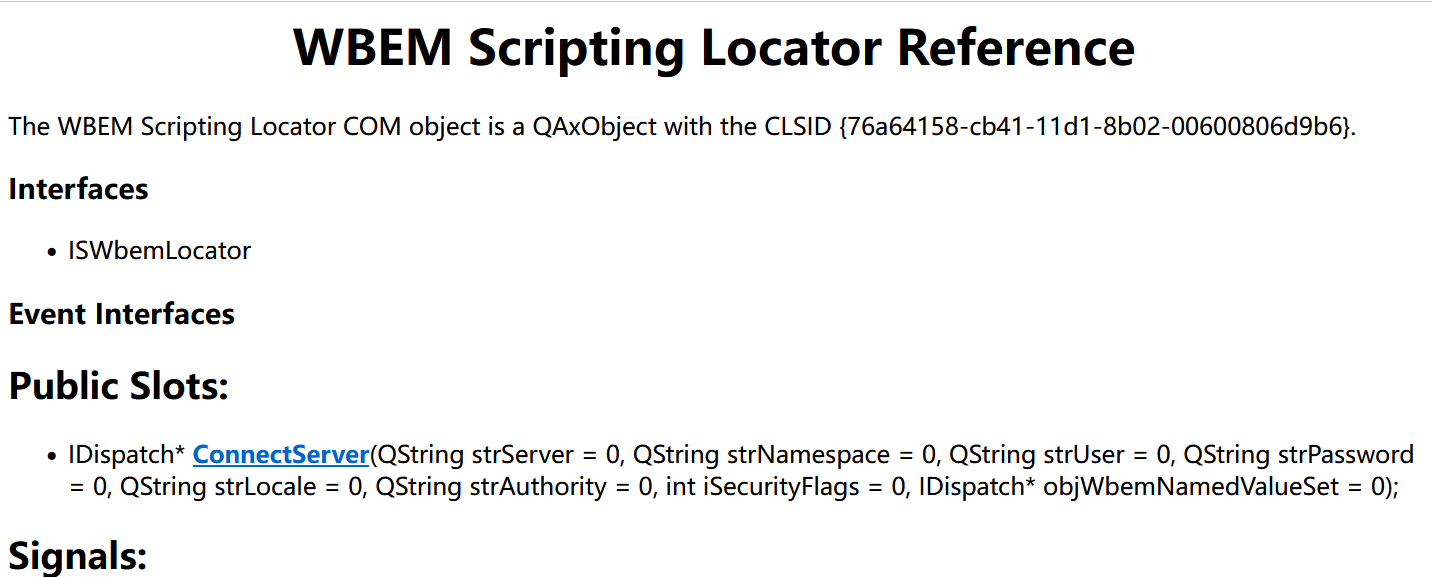
wbemLocator = new QAxObject("WbemScripting.SWbemLocator");
writeDoc("1.html", wbemLocator->generateDocumentation().toUtf8());
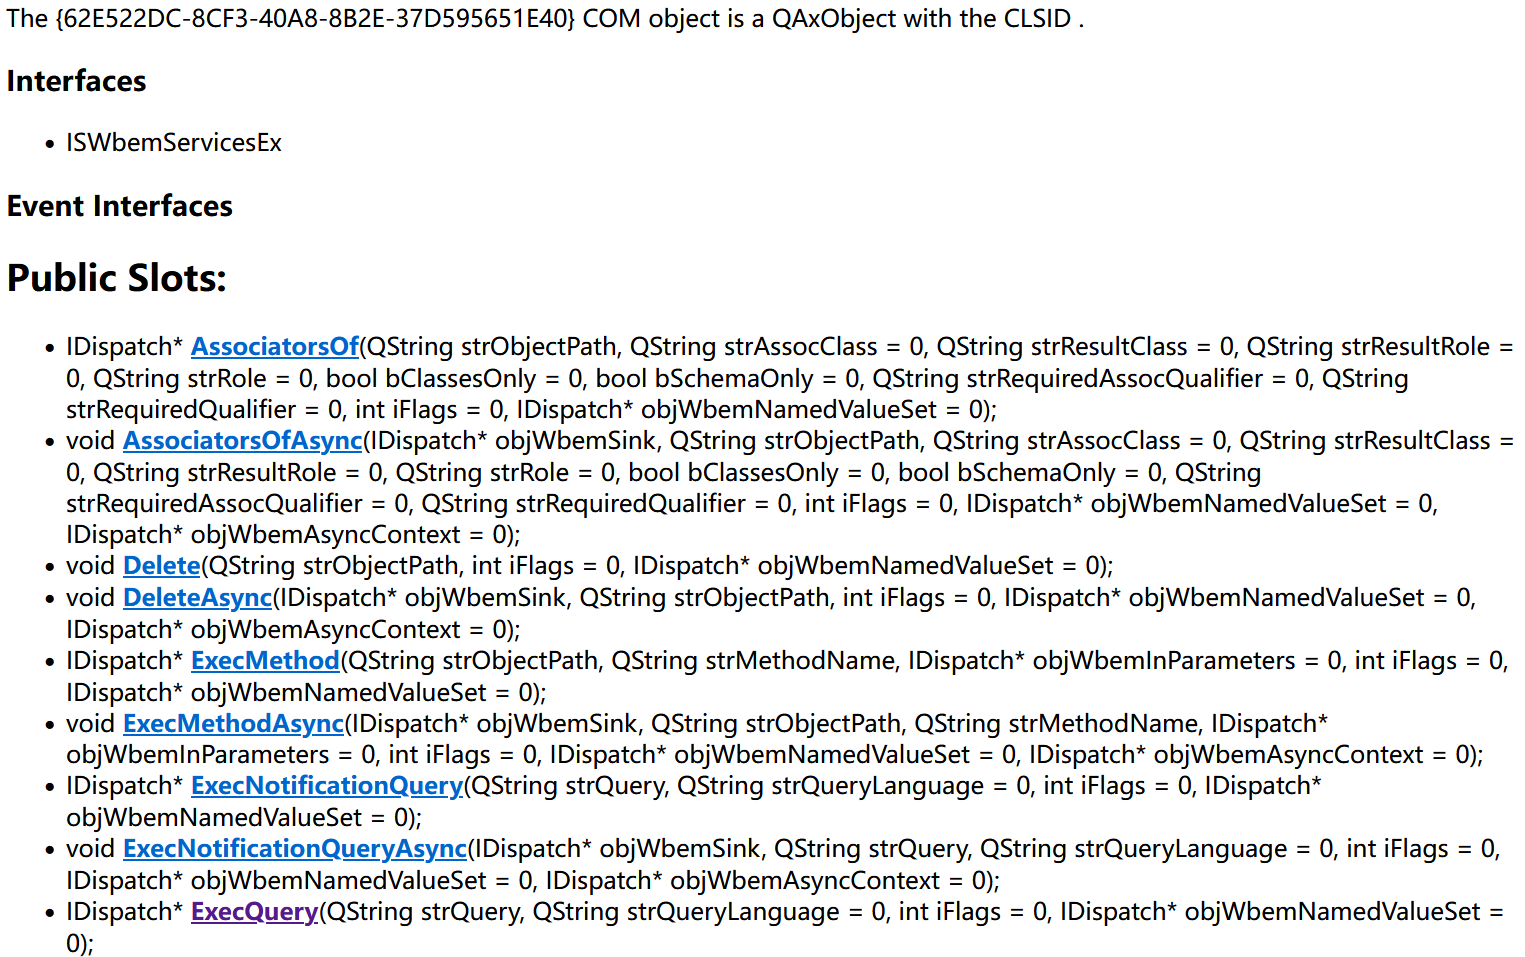
wmiService = wbemLocator->querySubObject(
"ConnectServer(QString&,QString&)", ".", "ROOT\\CIMV2");
writeDoc("2.html", wmiService->generateDocumentation().toUtf8());
|
得到:
以及
__cpuid, __cpuidex
除了WMI,CPU的ID可以通过 __cpuid 和 __cpuidex 来获取。
 1
 2
 3
 4
 5
 6
 7
 8
 9
10
11
12
13
14
15
16
17
18
19
20
21
22
23
24
25
26
27
28
29
30
31
32
33
34
35
36
37
38
39 | #include <intrin.h>
#include <iostream>
#include <array>
#include <vector>
#include <sstream>
#include <iomanip>
int main()
{
std::array<int, 4> cpuInfo;
// Calling __cpuid with 0x0 as the function_id argument
// gets the number of the highest valid function ID.
__cpuid(cpuInfo.data(), 0x0);
const auto nIds = cpuInfo[0];
std::vector<std::array<int, 4>> cpuInfos;
for (int i=0; i <= nIds; ++i)
{
__cpuidex(cpuInfo.data(), i, 0);
cpuInfos.push_back(cpuInfo);
}
// vender name in data[0]: 1, 3, 2
std::string vendor(12, '0');
*reinterpret_cast<int*>(vendor.data()) = cpuInfos[0][1];
*reinterpret_cast<int*>(vendor.data() + 4) = cpuInfos[0][3];
*reinterpret_cast<int*>(vendor.data() + 8) = cpuInfos[0][2];
std::cout << "CPU Vendor is : " << vendor << std::endl;
// serial number in data[1]: 3, 0
std::stringstream stream;
for (int i=3; i>=0; i-=3)
stream << std::setfill('0') << std::setw(8) << std::uppercase << std::hex << cpuInfos[1][i];
std::cout << "ProcessorId is : " << stream.str() << std::endl;
return 0;
}
|
运行结果
| CPU Vendor is : GenuineIntel
ProcessorId is : BFEBFBFF806C1
|
参考
- https://devblogs.microsoft.com/scripting/powertip-list-all-available-cim-classes-by-using-powershell/
- http://timgolden.me.uk/python/wmi/index.html
- https://pypi.org/project/WMI/
- https://www.codeproject.com/Articles/10539/Making-WMI-Queries-In-C
- https://github.com/qt/qtsystems/tree/dev/src/systeminfo
- https://github.com/jiangzhw/MachineCodeCal
- https://learn.microsoft.com/en-us/cpp/intrinsics/cpuid-cpuidex?view=msvc-170
- https://en.wikipedia.org/wiki/CPUID